Cleaning a heat pump filter in an air to air system is a pretty simple task that you can do at home without needing an engineer. You will need to locate and remove the filter carefully and inspect it for damage. You then clean the filter thoroughly, dry it completely and reinstall back into your unit.
For an air to water system it’s a bit more complicated. Most of the monobloc systems do not have air filters in the same way and rely on the grill of the external unit to filter out particles. These systems do have a strainer, or Y-filter in the water circuit, but this is for water not air. While these water filters are user serviceable, it’s a bit more of a complicated process and can also be done by an engineer as part of your annual check up.
Read on below to discover how to clean your heat pump filter effectively.
Introduction
With winter now upon us it’s essential to keep your heat pump working efficiently. Cleaning your heat pump filter is an essential part of maintaining your outdoor unit and keeping it in good working order. If you do this regularly it will prolong the life of the unit and increase the performance of your system.
Cleaning your air source heat pump filter might seem daunting but it is an easy task that you can do on your own. It shouldn’t take too long and doesn’t require a lot of equipment. It can make a big difference to the performance of your system however so it’s really worth understanding the process.
Do you have an air to air system or an air to water system?
In the UK, most of us have air to water systems. These systems take heat from outside your home and use it to heat water inside. This water is then used to drive radiators and underfloor heating, as well as for showers and baths etc.
If you have an air to water system it’s quite likely that you won’t have an air filter inside your outdoor unit which you need to clean. The grill on the outdoor unit does the job of keeping big particles out. You should make sure that this grill is free of leaves and dirt however, especially in the winter months.
In the US and parts of Europe, air to air systems are more common. These heat pumps work like an air conditioner in reverse. They take heat from outside your home and use it to blow hot air inside, raising the temperature of your home. With an air to air system you’ll often have another unit to heat your water.
With an air to air system, there is normally an air filter to clean, and it’s important that this is done regularly.
This article is mainly focussed on air to air systems. However, some air to water systems (like the Samsung EHS TDM Plus) can have an indoor ventilator and this may have an air filter which you’ll need to clean. Yes we know, it’s a bit complicated!
How to clean a heat pump filter in 7 easy steps
Find out how clean your heat pump filter and get the best results in our step-by-step guide:
- Locate and access the filter
- Remove the filter carefully
- Inspect the filter for damage
- Clean the filter thoroughly
- Dry the filter completely
- Reinstall the filter securely
- Schedule regular maintenance
Please note that this article is for information only, we can not be held liable for any damage to your unit. If you have any doubts please consult an HVAC engineer.
What you will need
Cleaning your heat pump filter doesn’t require any specialised equipment. It’s mainly stuff that you’ll find in the house, along with some hot water. That said, we would advise making sure you have the right tools on hand as it will make the process more streamlined and prevent any damage.
Here is a list of what you’ll need before you get started:
Protective Gloves
Wearing protective gloves shields your hands from dirt, dust, and any potential irritants on the filter. Gloves improve your grip, making it easier to handle the filter during removal and cleaning, and help maintain hygiene throughout the process. Use durable gloves that allow flexibility.
Soft brush or vacuum cleaner
A soft brush, or vacuum cleaner with a brush attachment, removes loose dust and debris from the filter surface without damaging the delicate fibres. Using a vacuum cleaner can be faster, especially for filters with fine mesh.
Mild detergent or soap
Mild detergent mixed with water helps break down stubborn dirt and grime without harsh chemicals that could degrade the filter. Choose a gentle, environmentally friendly soap to protect both the filter material and the environment. Avoid bleach or abrasive cleaners as these can damage the filter.
Clean water source
You’ll need access to clean, lukewarm water for rinsing away dirt and detergent residues from the filter. Make sure the water pressure is moderate to prevent damage.
Clean cloth or towel
A soft cloth or towel is useful for gently blotting excess water from the filter after rinsing. This step will help the filter dry more quickly without squeezing or deforming it. Use a lint-free cloth to avoid leaving fibers behind.
Flashlight or torch
A torch helps inspect darker areas of the heat pump unit where the filter is housed. You will need enough light to see any damage or blockages. Choose a compact, bright torch – a mobile phone with a torch setting will also do.
Instruction manual
Ideally you will also have the instruction manual on hand to give you specific guidance based on your machine’s make and model. Refer to the manual to avoid mistakes specific to your device.
Step 1: Locate and access the heat pump filter
First things first you’ll need to find out the exact location of your air source heat pump filter. This is sometimes but not always obvious. Most air source heat pumps have external panels secured with screws of clips that conceal the filter.
Using appropriate tools, carefully unscrew or release these panels without forcing them and put them aside. Make sure to handle the panels gently to avoid bending or damage. If you’re not familiar with your specific model we would advise checking the manual. The manual should give you a clear diagram of where to find the filter and how to access it. Some models have removable panels or components specially designs for easy filter access.
Very important! Always disconnect the heat pump from the power before attempting to reach the filter!
Our tips
Mark panel locations
Before removing panels, mark their orientation and placement with a pencil to ensure easy reassembly. This small step will stop you making a mistake when you’re reassembling the unit. We also advise keeping your screws in a separate container.
Use a flashlight
Illuminate the filter compartment clearly using a torch, especially in dimly lit locations, to avoid missing clips or hidden screws.
Take photos
Document the filter area and panel arrangement with your phone camera before removal as the photos will help you later on if you get stuck.
Step 2: Remove the heat pump filter carefully
The next step is to remove the filter. This must be done with care to avoid any damage or contamination. Try to handle the filter gently and be careful of the housing as you remove it. If you remove it correctly, you’ll extend the lifespan of the filter and ensure it gets a thorough cleaning.
Handle with clean hands or gloves
Always handle the filter using clean hands or, ideally, with a pair of gloves. This will prevent you transferring oil or dirt onto the filter material. Gloves also provide a barrier against accumulated dust.
Note the filter’s orientation
Observe and remember the exact orientation and positioning before removing the filter. This will be critical when you come to reinstall it and will make sure airflow and filtration function are maintained. It’s a good idea to take a photo at this stage.
Gently dislodge the filter
Use gentle pressure to slide or lift the filter from its slot or frame, avoiding bending or folding the material. Stubborn filters may a slight wiggle motion but never forceful pulling. Handle it gently to prevents tears or deformation.
Our tips
Label sides if needed
If the filter has specific sides, mark “front” and “back” on tape before removal. It will help to put it back correctly.
Use both hands
Support the filter evenly with both hands when removing to minimise bending .
Inspect surrounding area
Before full removal, check for any additional clips or fasteners securing the filter. Removing these prevents damage or breakage
Soft brush
If debris is caught near the edges, a soft brush can gently loosen material before full removal. This reduces mess.
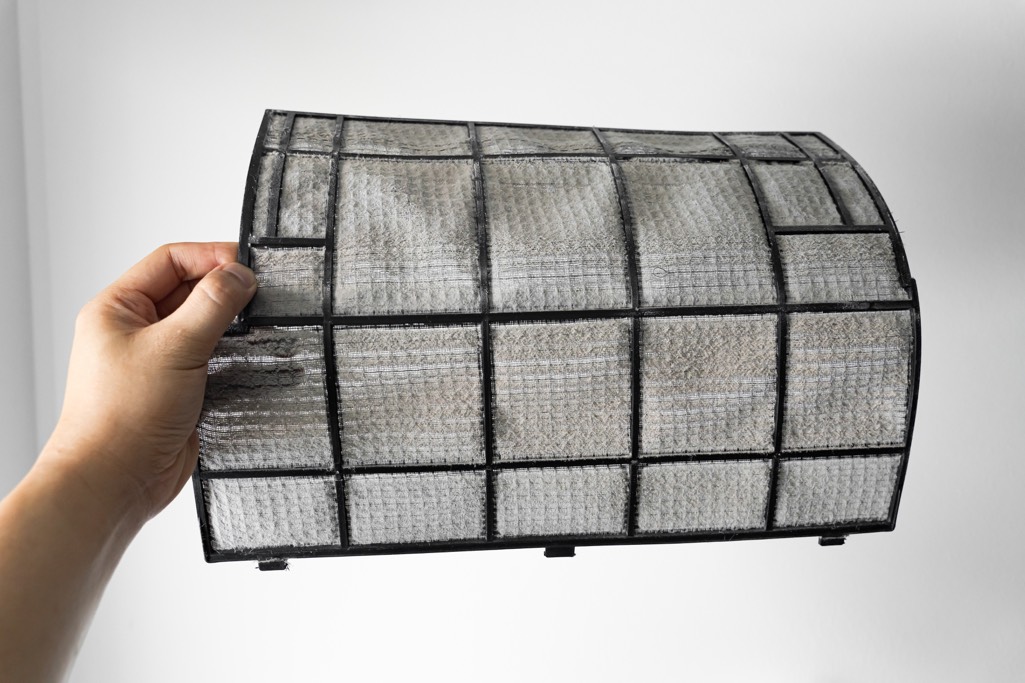
Step 3: Inspect the filter for damage
Before proceeding with the cleaning, inspect the filter closely for any wear, tears, or other damage that might compromise performance. Identifying these issues early can save your system from strain or failure later on. Understanding your filter’s condition also tells you whether replacement is necessary.
Examine Filter Material Thoroughly
Look for holes, rips, or thinning areas in the filter mesh or fabric as this will mean the filter is less effective. Use a bright light to highlight any imperfections. Even small tears can affect your filter.
Check Filter Frame and Edges
Inspect the frame or filter edges for cracking, warping, or loose components. These can prevent a secure seal within the heat pump housing which in turn allows airflow leaks.. Check that all seals and gaskets are intact and flexible.
Assess Accumulated Dirt Level
Check the extent and type of dirt build up on the filter. Clogged filters with heavier dirt or oily filters may require professional replacement rather than cleaning.
Our tips
Use a Magnifying Glass
For a more detailed check, use a magnifying glass on the filter to spot tiny damages invisible to the naked eye.
Compare with a New Filter
If possible, compare the used filter with a new one. This will show you more clearly if it’s damaged.
Note Serial Numbers or Dates
Record any serial numbers or manufacture dates on the filter. This will help you understand how your air filters perform over time.
Step 4: Clean the heat pump filter thoroughly
A meticulously cleaned filter boosts your heat pump’s energy efficiency and optimal airflow. But you’ll need to pay careful attention to detail during the cleaning process, to ensure that all dust and debris are removed without harming the filter itself.
Pre-Clean loose dust with vacuum or brush
Begin by removing loose dust and dirt using a soft brush or a vacuum cleaner with a gentle brush attachment. This initial step dislodges most particulate matter without wetting the filter, reducing deeper dirt layers.
Prepare mild soapy water solution
In a basin or bucket, mix lukewarm water with a small amount of mild detergent or soap to create a gentle cleaning solution. The detergent loosens embedded grime while being safe for the filter material. Avoid excessive soap to prevent residue buildup.
Soak and gently clean filter
Immerse the filter in the soapy water and allow it to soak briefly, usually 10-15 minutes, depending on the amount of dirty. Use your hands or a soft brush to gently scrub the surface, focusing on areas with stubborn dirt. Be careful not to apply strong pressure or force.
Our tips
Avoid high-pressure water
Never use high-pressure water jets as they can deform or tear filter fibers.
Use distilled water if possible
Distilled water helps prevent mineral deposits during rinsing, especially if your tap water is hard or contains impurities.
Change cleaning water as needed
It might be obvious, but replace your cleaning solution if it becomes too dirty.
Step 5: Dry the filter completely
You must dry the filter fully before you reinstall it. This is critical to avoid mould growth.
Blot Excess water with a clean cloth
Use a soft dry cloth (lint free) or towel to gently blot the filter, removing as much surface moisture as possible without squeezing or wringing. Handle delicately to prevent filter damage.
Air dry in a well-ventilated area
Place the filter on a clean surface in a shaded, ventilated space, free from direct sunlight and heat sources. Natural airflow allows even, gentle drying without warping or degrading filter material. Ambient temperature drying is safest.
Ensure complete dryness before reinstallation
Confirm the filter is completely dry by carefully feeling all surfaces and edges; even slight dampness could encourage mould or mildew. Allow extra drying time if needed. Reinstalling only dry filters keeps your heat pump running cleanly.
Our Tips
Avoid heat sources
Never use hair dryers, heaters, or direct sunlight for drying. Excessive heat can warp or degrade the filter’s material.
Elevate for better airflow
Place the filter on a rack or mesh surface to expose multiple sides to clean air.
Rotate the filter occasionally
Turn the filter periodically to ensure even drying and prevent moisture pockets.
Step 6: Reinstall the filter securely
Once your filter is clean and dry, reinstalling it correctly is the final step.
Verify correct orientation and positioning
Refer to your notes, photos, or markings made earlier to place the filter exactly as it was positioned.
Fit filter smoothly into housing
Gently slide or place the filter into its frame or compartment without forcing, ensuring it seats evenly and snugly. Pay attention to any securing clips, grooves, or seals that hold the filter firmly in place.
Replace covers or panels firmly
Reattach the front panel or covers precisely, tightening screws or latches without overtightening.
Our tips
Test airflow post-installation
After reinstalling, briefly operate the heat pump to ensure smooth airflow and listen for unusual noises indicating improper fit.
Secure loose parts
Double-check that all screws, clips, and seals are fully tight to prevent vibration noise and air leaks.
Keep instruction manual handy
Retain the manual for reference during future maintenance or troubleshooting, noting any specific reinstallation steps.
Step 7: Schedule regular maintenance
Establishing a regular cleaning schedule for your heat pump filter promotes optimal performance and extends the lifespan of your system. Be proactive, not reactive and ensure that your system remains in top shape. As they doctors say, prevention is better than cure.
Set your cleaning intervals based your usage
It might seem obvious, but you’ll need to adjust your cleaning frequency depending on your usage, but also the external air quality where you live. Homes in dusty or pollen-heavy environments require more frequent attention. It’s a good idea to start pretty regularly and then adjust your timing based on what you observe.
Our tips
Diarise cleaning your heat pump filter
It’s always easier when something is scheduled in your diary, that way you won’t forget.
Make sure you get your system serviced annually
To keep your unit it tip top shape it requires an annual service with a qualified HVAC engineer. Make sure this is diarised too and you won’t forget.
How to clean your heat pump filter – further reading
If you’re wondering how to clean your heat pump filter, the chances are you have an air source heat pump or you’re thinking of getting one. At WeLoveHeatPumps, we are on a mission to bring you simple, trusted and unbiased information about heat pumps. We are passionate about modern construction techniques and building homes for the future. We hope that by brining you easy to understand, non-partisan information we can encourage more people to switch to greener systems and do our bit for the climate emergency.
Don’t forget to check out some of our other articles such as how much does a heat pump cost and our review of the best heat pumps on the market.

Kieron Teeder. Kieron is our technical partner. He lives and breathes construction. He is an expert in modern building techniques and energy saving technologies.